So you’ve decided to dive into the world of effects pedals and create your own pedalboard. Way to go! Guitar pedalboards open up so many sonic possibilities and give you the tools to craft your signature tones.
There’s a magical feeling when you switch on your pedalboard and suddenly have instant access to lush reverbs, face-melting distortions, bubbly choruses, and trippy delays at your feet.
Setting up your first pedalboard can feel a bit daunting though. With so many pedals, cables, and accessories to choose from, how do you know where to start?
Well, in this comprehensive guide on ‘how to set up a pedal board,’ I’ll walk you through everything you need to know to build your dream pedalboard from the ground up. Consider me your pedalboard sherpa!
By the end of this, you’ll have all the knowledge to put together a pro-level effects rig that will take your guitar playing into uncharted territories. So let’s plug in and get started.
Choosing Your Pedals
The first step on your pedalboard journey is selecting the right effects pedals that will give you the core tones you need. While there are literally thousands of boutique stompboxes out there to geek out over, I’d recommend starting with these essential pedal types:

Tuner
A tuner should be the first pedal in any signal chain. You want your raw guitar signal going straight into the tuner so it can most accurately detect the notes you’re playing.
Nothing will ruin your killer tones faster than being out of tune! The industry-standard Boss TU-3 Tuner is a perfect choice that will last you a lifetime.
Overdrive/Distortion
These gain pedals are the key to taking your amp from clean to mean. An overdrive like the trusty Ibanez Tube Screamer adds warmth and bite, while a distortion like the Boss DS-1 or ProCo Rat generates heavy saturation and sustain.
Heck, you might even want both! Overdrives generally sound more natural, while distortions produce insanely thick distortion.
Wah
The funky, vocal-like tones of a wah pedal are a must for any pedalboard. The Dunlop Cry Baby wah is iconic, but there are mini options from Morley and others if space is tight. Position the wah early in your chain for a wider sweep range.
Modulation (Chorus/Vibrato)
Modulation effects like chorus add shimmer and dimension to your tone. A chorus pedal doubles your signal to create a rich, detuned sound that works great with clean tones.
The Boss CE-2 Chorus Ensemble is a legendary choice, but the MXR Analog Chorus also rules if you’re on a budget.
Delay
What’s better than one note? The same note repeating over and over! Delay pedals create echo and allow you to play over the top, which is tons of fun.
The Boss DD-3T Digital Delay is affordable and road-worthy, while the more expensive Strymon TimeLine serves up studio-quality delay tones.
Reverb
No pedalboard is complete without ambient reverb to give your guitar a sense of space. Reverb at the end of your chain creates a perfect sheen to your tone.
The TC Electronic Hall of Fame Reverb comes loaded with quality reverbs, or snag a Fender ’63 Reverb for old-school spring reverb vibes.
That covers the core essentials, but your tonal needs may require more specialized pedals:
- Compressor: Eases your dynamics and adds sustain. Try the budget-friendly MXR Dyna Comp.
- Fuzz: Vintage fuzz boxes like the Dunlop Fuzz Face crank up the fuzziness for massive saturation.
- Octaver: Drops your guitar signal 1 or 2 octaves down for bass-like tones. The Electro-Harmonix POG2 covers all the bases.
- Noise Gate: Removes unwanted noise while preserving tone. Boss makes the popular NS-2 Noise Suppressor.
The choice between analog and digital effects comes down to personal taste. Analog pedals use old-school transistor-based circuitry to produce warm, organic tones.
But they can be inconsistent and prone to noise. Digital effects use crystal-clear DSP chips for precise, modeled tones. But some feel they sound too “perfect.” Try both types to see what inspires you most!
For an all-in-one solution, a multi-effects processor combines dozens of effects so you only need one unit. But you lose the unique character of individual pedals. The Boss ME-80 provides awesome value with over 70 built-in effects.
Now that your pedal menu is set, let’s move on to choosing the perfect pedalboard to mount them on.
Selecting a Pedalboard

Pedalboards come in a range of sizes, shapes and materials to accommodate any configuration of foot-stomping mayhem. Consider how you plan to use your board to narrow down your options:
Pedalboard Size
For maximum power, a large 24″ x 16″ pedalboard like the Pedaltrain Classic 2 will fit an array of both standard and mini pedals with room to grow. Lugging around a big board gets tiring though.
For portability, mini pedalboards around 14″ x 7″ from Donner or Mooer hold 3-5 mini pedals for travel-friendly boards.
Pedalboard Brands
The Pedaltrain line sets the standard for quality metal boards with raised rails to mount pedals and hide cables.
Temple Audio takes a unique approach with modular aluminum planks you can connect. Mono makes super light carbon fiber boards. And T-Rex offers affordable boards with two-tier designs.
Material
Aluminum pedalboards are lightweight but strong. Wood looks gorgeous although can dent and scratch. Plastic boards like Behringer are the cheapest but feel flimsy. Go with aluminum or wood for sturdy pedalboards built to last.
Take time laying out pedals on a pedalboard planning sheet before buying. It’s no fun having pedals hang off the edge of an undersized board! Some pedalboards even have handy integrated loop switchers like the Voodoo Lab Dingbat to easily program pedal presets.
Okay, you’ve got your pedalboard – now we need to power up this party!
Powering Your Pedalboard
Power supplies are the unsung hero of any pedalboard. A quality isolated power supply ensures all your pedals receive stable, clean power for noise-free operation.
Isolated vs Daisy Chain
Isolated power supplies like the Voodoo Lab ISO-5 and Cioks DC-5 feed each pedal from an individually filtered output, removing noisy interference.
Daisy chains like the 1 Spot chain several pedals from one unfiltered output, allowing interference across the shared ground. Spend a little more on an isolated supply – your ears will thank you!
Power Requirements
Pay close attention to your pedal’s voltage (9V, 12V etc), current draw (mA), and polarity (+/-) needs.
Supplying improper power can damage pedals. Thankfully most pedals are standard 9V DC negative polarity. Higher current digital pedals may need 12V or 18V however.
Recommended Power Supplies
The Voodoo Lab ISO-5 (5 isolated outputs) and MXR Iso-Brick (10 isolated outputs) are rock-solid mid-sized options. The T-Rex Fuel Tank Chameleon offers 8 isolated outputs with custom voltages. For small boards, the tiny Pedaltrain Volto packs 3 outputs in a mini enclosure.
For road warrior boards, look into a rechargeable power solution like the Strymon Zuma R300 or Fender Engine Room. No more hunting for power outlets at gigs!
Vintage Pedals
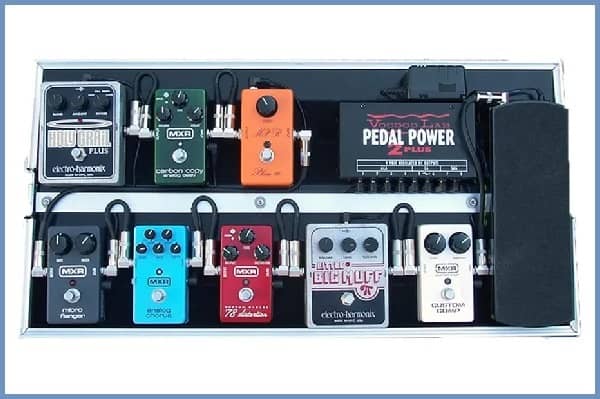
Some finicky vintage pedals need lower voltages around 6V-9V. The Voodoo Lab Pedal Power 2 Plus allows you to dial down voltages. Or use a battery to get natural sag and compression.
Alright, we’ve got power handled. Now to link up the pedals into a unified tone machine!
Connecting Your Pedals
Quality cables are key for noise-free pedalboard connectivity. You have two main options:
Patch Cables
Pre-made patch cables like the Ernie Ball Flat Ribbon cables come in common lengths like 6″ and 12″ to link adjacent pedals. Their low-profile connectors maximize pedalboard real estate. Mogami, Hosa and LiveWire also make nice patch cables.
Cable Kits
For a clean custom look, solderless cable kits from Evidence Audio or Lava Cable let you make any length of cable you need. You simply cut and attach connectors to bulk cable. It takes some time, but the flexibility can’t be beaten.
To avoid tone suck, spend a bit more for high quality premium cables made with oxygen-free copper. Crappy no-name cables can degrade and corrode over time.
If space is super tight, pedal couplers connect pedals vertically without extra cables. But frequent stepping on couplers can stress the jacks.
Get those cables neat and tidy with velcro cable ties stuck to the pedalboard and adhesive cable mounts. It keeps everything secure and out of the way.
Now it’s time to strategically position your pedals for foot and tonal bliss.
Arranging Your Pedals

While there are no rules set in stone when laying out your pedals, there are some logical guidelines to consider:
Signal Chain Order
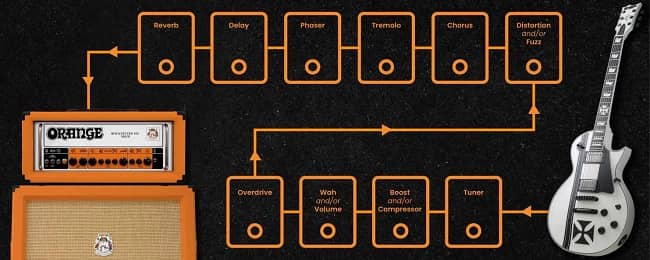
The traditional pedal order goes:
Tuner > Wah > Compressor > Overdrive/Distortion > Modulation > Delay > Reverb
This flows from clean effects through to distorted tones and time-based effects. Feel free to experiment with creative routings though!
Using Effects Loops
Effects loops on amps allow you to run time-based effects between the preamp and power amp for a more seamless sound. Just connect the amp’s send to the pedal input, and the pedal output to return.
Pedal Placement
Position frequently used pedals (overdrive, boost, tuner) closest to the front edge for easy foot access. Place rarely used pedals off to the sides or back row. Mini pedals can fit in small gaps between regular sized pedals.
Leave a little open space in your layout to allow for future expansion when the pedal bug bites again!
Assembling Your Pedalboard
The fun part is finally here – it’s time to put the pedalboard puzzle together and bring your tonal masterpiece to life!
Preparing Your Pedalboard
First, wipe down the board surface thoroughly with isopropyl alcohol to remove any residue or oils for maximum adhesion.
Applying Velcro
Use the soft/loop side of the velcro on the board so dust doesn’t get caught in the hooks over time. Run long vertical strips of velcro at the edges and in the center to allow flexible placement.
Remove rubber feet from the pedals and attach the rough/hook velcro to the bottom. Avoid using too much velcro to allow easier pedal removal later on.
Testing Power
Temporarily connect your power cables to ensure all pedals power on before securing everything. This saves headaches down the road!
Connecting Patch Cables
Follow your planned layout and use pre-cut patch cables or custom lengths snipped from a cable kit to link up all the pedals.
Cable Management
Group longer power cables together and fasten them to the pedalboard rails with velcro ties to contain the sprawl.
Securing Pedals
With everything functioning properly, firmly press down on each pedal to adhere the velcro and fasten them to the board.
Add some final touches like cord holders and cable guides to keep connections solid. And voila, your pedalboard is complete!
As you can see, building a pro-level pedalboard requires some planning and effort to do it right. The time spent upfront visualizing your layout and selecting quality components pays massive dividends in inspiring creativity and amazing sounds down the road.
While it takes a few hours to assemble that first pedalboard, maintaining your rig over time is easy. I highly recommend documenting your pedal settings and signal chain so you can recall special tones and arrangements.
Final Words
Don’t be afraid to continually evolve your pedalboard as your playing grows and you discover new effects you love. That’s half the fun! Just be sure to sell unused pedals to fund new ones and keep clutter at bay.
I hope this guide has equipped you with all the knowledge needed to develop your own killer pedalboard rig. Now turn up those amps and make some noise! Let your imagination run wild with all the textures and colors now available at your feet.
Your tone quest awaits…
About the Author
Team Guitar Top Review Talk about Guitars! We are a group of friends that bonded over their shared love of playing guitar. We all have different backgrounds and experiences with music, but we share a passion for writing about the things that we love.


