

Part of playing the guitar beautifully includes running your fingers along the fretboard smoothly. This movement allows for swift and seamless transitions and better overall sound.
Unfortunately, guitars inevitably experience fret sprouts once in a while. Regardless of how expensive or cheap a guitar is, there is a possibility to notice fret sprout.
But what is fret sprout, exactly?
Fret sprout refers to a condition where the tangs or ends of the metal frets protrude out from the edges of the wooden fingerboard. This typically occurs when the wood of the fingerboard shrinks or contracts due to dryness or lack of humidity in the environment.
In this article, we will give you a detailed discussion about this condition. We will discuss its causes, how to detect if your guitar has it, and ultimately, how to fix it. If you’re interested, continue reading to know more.
How To Detect Fret Sprout
Luckily, determining whether your guitar has fret sprouts is quite easy. You don’t need any professional guitarist experience to detect this problem. Yes, even absolute beginners can do so.
To determine the presence of fret sprouts, you simply run your thumb and fingers along the neck of your guitar. Make sure to do this repeatedly until you’re sure about any protruding sharp frets – or lack thereof.
But, remember that you may also feel the ends of a perfectly normal fret. This is not exactly a fret sprout! Instead, try to feel if actual protrusions are poking out – or those that seem to extend beyond the fretboard. If you don’t, then your guitar is perfectly fine.
But if you do, then you should try to fix that as soon as possible. Otherwise, you won’t be able to play your guitar as smoothly and comfortably as possible.
What Causes Fret Sprout?
Now that you know what a fret sprout is and how it can be detected, we should also discuss the factors that cause this issue. Here are among the most popular reasons.
Weather
One of the biggest causes of a fret sprout is warm and dry weather. Since most fretboards are wooden, the lack of moisture in the air makes the wood shrink. Thus, this results in protruding frets.
Low Humidity
Even if you don’t live in a hot and dry place, there’s still a chance for the fingerboard to shrink. If you keep the guitar in a room that’s filled with dry air, then there’s a big chance that it will develop fret sprout. Unfortunately, that makes the guitar quite high maintenance.
That’s why experts advise that you keep guitars in an area that has enough humidity levels. That will not only maintain their overall structure but will also help maintain its tonal quality. This is one of the most common mistakes made by beginners.
Transport Conditions
While it’s unlikely for the frets to become misplaced during transport, there’s a chance for the wooden fretboard to shrink during the transport process. Usually, this happens when the guitars are shipped in a container that has low humidity levels.
So basically, the biggest cause of fret ends sticking out is the shrinking of the wooden fretboard due to low moisture levels in the air. That should be a storage pointer to remember to ensure that your guitar maintains its best shape.
As A Result of Fret Dressing
In some cases, filing guitar frets leaves you with sharp and protruding edges. These sharp edges fall under the fret sprout category, even when they’re not as protruding.
Ordinary Craftsmanship
In the case of cheap guitars from unknown or least known brands, sharp frets can identify on the fretboard due to poor craftsmanship and no quality control at the factory level. And these poorly crafted instruments hit the stores with protruding fret ends for buyers who know nothing about guitar.
How To Fix Fret Sprout?
There are a few different methods that can be used to fix fret sprout. The main processes include re-humidifying the guitar, filing and sanding down the sharp fret ends, or taking the instrument to a professional luthier for fretwork.

1. Re-humidification Process
Lack of humidity is the most common reason for the protruding fret end. It’s ideal to keep your guitar in an atmosphere where the humidity range stays between 40-50% to get better performance from your instrument.
So to resolve the humidity issue, you can use a room humidifier if you leave your guitar outside of a case or on a guitar stand. On the other hand, use a case humidifier if you keep your guitar in a case.
And properly using a humidifier will stop the fretboard from shrinking. Since the issue is related to frets so using any soundhole humidifier (which works best for the guitar body) will not fix the problem.
If you want to fix a fret sprout that occurred due to low humidity, there has a reverse technique or re-humidification process to get moisture back into the fingerboard by using a humidifier. It will expand the fretboard again to its normal shape as it was before shrinking.
You have to keep your guitar inside an airtight case with a humidity control system like D’Addario Humidipak for a couple of weeks or even for months.
This is a time-consuming activity that depends on how long or continuously you can keep your instrument in its case, how dry your guitar’s neck wood is, and also depends on the level of humidity produced by the humidifier.
In this humidification task, there are chances to introduce higher humidity to your guitar. In that case, the guitar will absorb too much moisture than required and due to the swelling, it can cause body damage, fret buzz, or intonation problem.
2. Filing and Sanding Technique
Fortunately, this problem has another remedy. If you’re interested in fixing fret sprouts on your own, simply follow the steps laid down below.
Before you begin, make sure to assess the fret sprout situation on your guitar first. If you only need to soften a few sharp edges, you should learn how to file fret ends.
To do so, you simply need a nail file for smoothing fret ends on the guitar. Move the file around the fret edges until you achieve your desired outcomes – it’s that easy.
On the other hand, if your guitar has a serious fret sprout problem, then you have to use more tools. Observe the following steps to fix the fret sprout successfully.
Step-1: Prepare
Gather all the tools needed for this work. Among the materials you need are a fret leveler, painter’s tape, a fret end dress file, and some finer grit sandpaper. We won’t use any fret beveling file, belt sander, or other specialized files as pro luthiers use for the repair job.
Step-2: Cover Fretboard
Once you have gathered everything, you can now start fixing the fret sprout. Start by removing the guitar’s strings and then covering the areas around each fret with painter’s tape (or masking tape).
Make sure to wrap the sides of the neck as well. Also, make sure that only the fret wires are sticking out once you’re done wrapping the guitar neck. This tape will protect the guitar from all the metal shavings.
Step-3: Level Out the Frets
Once you’ve covered the guitar neck properly, grab the fret leveler and place it on your open palm. Use your thumb to get a good grip over it, while four of your fingers remain extended out. These fingers will help you support the neck as you level out the protruding frets.
Now, make up and down motions with the fret leveler along the guitar neck. Make sure that your fingers are supporting the neck to prevent it from bending or snapping.
As you level out the sharp frets, it’s necessary to apply the right amount of force to shave out the metal. But, make sure to be gentle enough to prevent damage to your instrument.
Repeat this procedure on another side of the fret until you’re satisfied with the results.
You can use the StewMac Fret Leveling File to complete this step:

- This custom-made file gives you a handle on your fret work
- Works quickly to level frets or fingerboards, leaving a smooth finish
- Features comfortable hardwood handle
- 6-inch length is perfect for general use
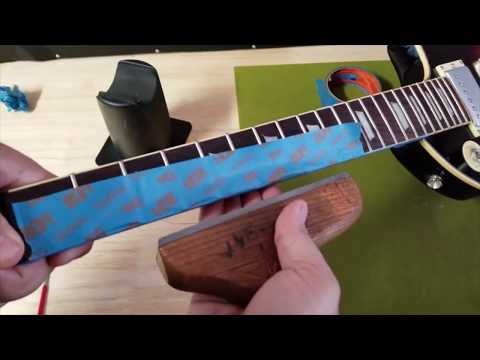
Step-4: Filing Fret Ends
At this point, you no longer have protruding frets. Unfortunately, the edges can still be sharp, so you have to round them out with a fret-end dress file.

To use this file, have one hand to hold the handle while the other one holds the tip of the dress file. Holding it this way will give us the best control to smoothen out all the rough and sharp ends.
Also, it’s best to move the file in only one direction to ensure excellent finishes. Repeat this process until all frets have rounded edges.
Use FretGuru Ultimate Fret End File to complete this step:

- Most advanced and precision fret end dressing file
- Precision flat ground, diamond honed and polished bottom
- Top of file has a smooth, safe ground edge
- Innovative Double Ski-Tip design
Step-5: Smoothen Out And Polishing The Frets
Now that you’re done fixing sharp fret ends, the next step is to finish up by shining and smoothening out the fret ends. You can simply use the sandpaper or flat-file sanding stick for this step. Also, Micro-Mesh soft touch sanding pads will do the job.
Use any of these options to sand down the ends of the frets. Again, continue the method until all fret ends are rounded and smooth. It would be beneficial if you take this opportunity to polish all frets beside the fret ends.
Use Micro-Mesh Soft Touch Sanding Pads to complete this step:

- Works extremely well when working with CA finishes
- Pack includes 1 each 2-inch by 2-inch soft touch pads
- Includes following grits: 1500, 1800, 2400, 3200, 3600, 4000, 6000, 8000 & 12000
- Also, includes a color coded grit guide.
Step-6: Clean-Up
And finally, it’s time to clean up. Before you remove the painter’s tape, make sure to get rid of any metal shavings and debris from your guitar. Just use a paper towel to wipe that dirt away. Once you’re sure that there are no more abrasive metal shavings, you can safely remove the protective tape.
And that’s it – you now know how to fix a fret sprout.
You can also watch this helpful YouTube video demonstrating proper fret end filing techniques.
3. Professional Fret Work
As a last piece of advice, we only recommend that you do this if you’re willing to set aside the time and effort to see it until the end. Remember that fret sprout repair requires a lot of patience on your part with specialized tools and experience.
While DIY methods may work, having the job handled by a professional luthier will ensure excellent results, especially for expensive instruments. Fret dressing may cost you a few hundred bucks, but it’s worth every penny if you want to ensure the best outcomes with peace of mind.
Frequently Asked Questions
How much does fret leveling cost?
The cost of fret leveling depends on the amount of the job done. The price considers the experience of the repair expert and the difficulty of the job.
On average, fret leveling costs around $75 to $120. Some of these repair professionals would even charge as high as $200.
Do new guitars need fret leveling?
That depends. Generally, new instruments are expected to perform at their best, so no fret leveling is needed as soon as you get your hands on them.
Unfortunately, if the temperature was not maintained throughout the delivery process, there’s a big chance that the fretboard has expanded, and you may need to level the frets.
How often should you fret dress?
The answer to this question largely depends on the quality of your guitar and how often you play it. Generally, dressing fret ends should be made only once you start feeling grooves or when they seem to be uneven. This can occur between a few months up to five years.
Final Words
While casual players may not notice slight fret sprout, professionals can feel even minor protrusions. Fortunately, this common condition is easily fixed with the right tools and some patience.
Following the steps outlined here will help repair fret sprout, allowing you to smoothly play your guitar again. With this increased awareness and care, your guitar’s fretboard will be sprout-free.
About the Author

Fabian, a Brazilian guitarist now based in Dublin, Ireland, has passionately played the electric guitar since 2003. As a luthier and product specialist, he boasts nearly two decades of collaboration with top musical instrument brands. Fabian is a sought-after expert, sharing his extensive knowledge with fellow guitar enthusiasts.